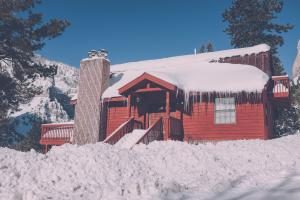
 Along with the snow and frosty temperatures, icicles are a lingering reminder that New England is still firmly entrenched in winter. Icicles, while festive, are an official sign of an ice dam on the roof. Less cheery are the ice bands that can also form along the roof eaves, and both of these wintry growths can cause damage to the roof and interior of any home with a pitched roof.
What causes ice dams?
Anyone who’s lived through a New England winter has seen some evidence of an ice dam in their town! Three conditions are necessary for ice dams to form: snow, a source of heat to melt the snow, and subsequent cold temperatures to re-freeze that melted snow into ice. It doesn’t take much snow to form an ice dam – even two inches of accumulation can be enough if followed by sub-freezing temperatures. Once the snow is piled on top of the roof, which has been warmed by the heat escaping from the home, it starts to melt.
As the melted snow runs down the roof slope, it’s met by a heap of snow along the eaves. The water then runs below the snow pile and, once the temperatures dip, re-freezes at the very edge of the roof, creating a literal dam of ice. (This ice dam will start to melt once the temperature rises again, and the dripping water will form into icicles.) This dam prevents anything from trickling off the edge of the roof – so the moisture is forced to go back under the surface of the roof, and at this point becomes a major concern for homeowners and associations alike.
Contrary to what some believe, ice dams are not caused by faulty gutters. While they may help concentrate the ice and water (melted snow), the sturdiest gutters won’t prevent them from forming. The upper roof area is directly above the living quarters and therefore the warmest spot on the roof; the gutter and eaves are the coldest spots, as they are generally not affected by heat escaping from the home.
What kind of damage is caused by ice dams?
An ice dam forces the snow and water to flow underneath the roof’s shingles or shakes. As more snow melts, the water flow can leak into the attic or sidewalls of the home, causing damage to walls, ceilings, and insulation. Gutters may be sagging or completely torn off from the roof eaves because of the weight of the ice and snow. Missing or dislodged shingles are also a common result of ice dams.
Once water has started to leak into the living area, the residents may soon be able to see the damage. Homeowners will have water-stained ceilings, peeling paint or wallpaper, damaged plaster, and wet or otherwise damaged insulation. Serious damage can even include rotting wall cavities, corrosion of metal construction components, and severe structural damage. If this is the case, act quickly and hire a Professional Engineer to assess the damage and help your Board implement a plan to repair any roof or interior damage safely and effectively. A professional contractor will know which products and techniques are the safest and most reliable.
What if we already have ice dams?
If you decide to deal with the ice dams yourself, follow these guidelines:
- Do not use hammers, picks, axes, or ordinary de-icing salt, as this may damage your roof.
- If you need to use a ladder, make sure it’s set and secured properly. Always use extreme caution when working on a ladder. Actually crawling on to the roof is too risky, but even working underneath one poses hazards.
- Use a roof rake to clear snow a few feet back from the eaves, making sure not to remove all snow from the roof. Leaving a one-inch layer of snow to ensure that you don’t cause shingle damage with your clearing instrument.
- Do not attempt to chip away at the ice dam or make a “channel” so the melting snow can run off the roof. This may cause additional damage to your roof and places you at risk from falling pieces of ice. If done safely, it’s fine to carefully clear icicles to reduce the pressure from the gutters.
What can be done to prevent ice dams?
It’s not easy to prevent ice dams, but it’s less expensive for your association to do what it can instead of paying out even more money to repair the damage they cause. So how does an association stop ice dams from occurring next winter?
- Increase ceiling and roof insulation to prevent heat from the rooms below from travelling up to the roof. Also, investigate making ceilings in the homes airtight, especially on the second floor.
- Ventilate each home’s roof so that the temperature will stay somewhat uniform across the entire surface. Consult a building professional for the best venting system for your community.
- Check for any leaks that deposit warm air into the attic, and remedy those.
- Never terminate exhaust vents in the attic. This can cause a host of problems, including aiding in the forming of ice dams in the winter and mold growth year-round.
- Heat tape is not an efficient solution, as it really treats a symptom of ice dams, not the actual cause.
The heat that rises from the inside to the roof can have various means of escape. Heat can move through the ceiling, wall cavity, or insulation, especially if there are cracks in the structure. Kitchen and bath exhaust systems can also cause warmer spots in the middle of the roof slope that can contribute to melting snow, especially in homes where the exhaust vent is improperly installed.
Ice dams are caused by this heat entering the attic, which in turn unevenly heats the roof. No matter which course of action your association takes, start with the two-prong approach: ventilate the roof and insulate the interior. This will reduce the likelihood that your association will be plagued by ice dams and water damage this winter.